CUTE BAG:
Cut 1 Rectangle : 30” X 15” in fabric and batting.
Quilt it… trim to 28” X 13”
Cut 1 Rectangle : 20” X 17” in fabric and Batting.
Quilt it then cut two semi-circles from it using the pattern.
Make or buy piping to match lining fabric.
Attach piping to the long sides of the rectangle.
(Piping is optional)
Sew the semi-circles (quilted) to the long sides of the rectangle.
LOOPS: Cut a 36” X 1 ¾ “ strip from main fabric, fold both long edges in by ¼” , press then fold in half. Press and stitch down the long side to close. Cut these flattened tubes into 10: 1” X 3 ½” pieces. (Approx width)
Fold each piece in half, space 5 of the loops evenly onto the straight edge of each semi-circle and baste in place. Repeat for the other 5 loops.
Prepare Lining: Cut 1 rectangle 28” X 13” AND cut 2 Semi-Circles (using pattern) from lining fabric.
Cut 2 : 9” X 12” rectangles for pockets.
Prepare pockets by folding in half with right sides together, stitch around the 3 open edges, leaving a small opening to turn it right side out. Turn right side out, press then stitch ½” all the way around all 4 sides.
Centre Pockets on the right side of semi-circles (lining fabric) and sew on.
Sew semi-circles onto the rectangle, leaving a small opening for turning the bag right side out later on.
PIN outer bag to inner bag ( right sides together) to check it fits, trim upper edges so they are the same.
ROD CASINGS: cut 2: 3 ½” X 12 “ strips, Hem each end, then fold in half lengthways and press.
Stitch one rod casing to the top of the quilted rectangle, and one rod casing to the other top of the quilted rectangle.
Join lining to outer bag, turn right side out through gap left in lining, press then top stitch all around the top edge.
Cut 2 lengths of dowel as long as your Rod Casing and screw eyelets to ends of dowel, slip through rod casings. Stitch at each end to hold dowel in place.
ABOVE: eyelets.
Make HANDLES/STRAP: Cut 2: 4" X 20” from fabric.
Cut 2: 20” lengths of webbing or batting. Fold and press the fabric in ¼” on both long edges, press… lay on top of webbing and sew together. Make 2.
Attatch ’D’ rings to each end of both straps . (You can actually make the handles/straps any way you like, with or without the webbing)
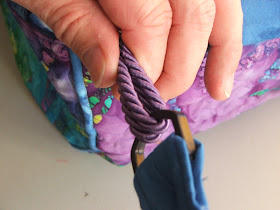
Cut two lengths of cord, 38” long, fold each in half and ‘half hitch’ through a ‘D’ ring on each strap.
Thread through eyelet, then loops, then the other eyelet and fix securely to the ‘D’ ring on the end of the other strap.
ABOVE: last photo, stitch down the cord securely so it doesn't slip out of the D ring at this end.
Repeat on the other side.
DONE.
Adding a button loop and button is optional. If you add a button loop, it goes between the rod casing and the right side of the bag when you are joining the lining to the outside of the bag.
I hope my instructions are clear enough! If you have any problems just email me at : stewandchris@hotmail.com and I can help ya!


That is so cool! Thanks!
ReplyDeleteYou have to be freaking kidding me... I don't understand the first instruction let alone the last!! How do you quilt? Clearly you don't realise how clever you are because I couldn't even begin to make one of these :) ... best get back to my pina colada in the sun.
ReplyDeleteThanks for the pattern. It looks like a fantastic bag.
ReplyDeleteOHH my I fell in love with the flower one !! you are soo clever Mrs !!!
ReplyDeleteThank You Chris. I'm onto it now. Going to make one out of curtain fabrics.. see how it goes. I buy the waterfalls cheap from interior decorating shop.. gorgeous fabrics.
ReplyDeleteJez, that is like rocket science to us non-sewers! I can only sew a straight line! Ditto what Lynda said! WOMBAT
ReplyDeleteThanks for the pattern! I may just have to try this soon (as soon as I have some time!)!
ReplyDeleteI was fine up until you ran out of pictures......You really need to fill in hte gaps with pictures....then I might try to make one of these.!!!!
ReplyDeletehaha I am like the other non sewing plebs I got lost at WARNING!!
ReplyDeletewow i love the flower power bag
ReplyDeleteOh thank you so much for sharing this pattern. Looks like I have my first sewing project, for when the kids are back at school.
ReplyDelete